How to record a Forex Payment/ Receipt Entry
Forex payment entry is an entry in which the payment is either made/received in foreign currency
To make a forex transaction entry in our system you have to follow the given procedure:
- On the dashboard of accounting module search for "Forex Payment Entry" in the global search bar and select it (as shown in figure)

- List view page of "Forex Payment Entry" would open up. You need to click on "New" (as shown in figure) to start making the transaction entry
Once you click on "New" following page will open up ( Refer 2nd figure) and you can start entering the basic details:

- Posting Date: Date on which the entry should hit in the accounting books
- Payment Type: You can select the " Payment Type" as "Pay" (if you are making the payment in foreign currency) and " Receive" (if you are receiving the payment in foreign currency)
- Mode Of Payment: Select NEFT, RTGS, Credit card and so on from the list via which you have made/received the payment
- Posting Branch: Branch which is making the respective entry

- Once you have entered the basic details of the transaction, you need to select the Party type,Party and account from which payment is made or in which payment is received

- Select the Party type on the basis of transaction type (Pay/Receive) as Customer or Supplier
Once you select the "Party Type", tabs to enter other details would automatically open up ( as shown in figure)

You need to enter the "Party" to whom the payment is made or from whom it's received
Party Name would be auto-filled by the system
- Once you enter the party name, you need to enter the bank account (Forex Account) in which the Payment is either received or from which the payment is made to the respective supplier/ customer

- Once you enter these details, other details related to this account would show up
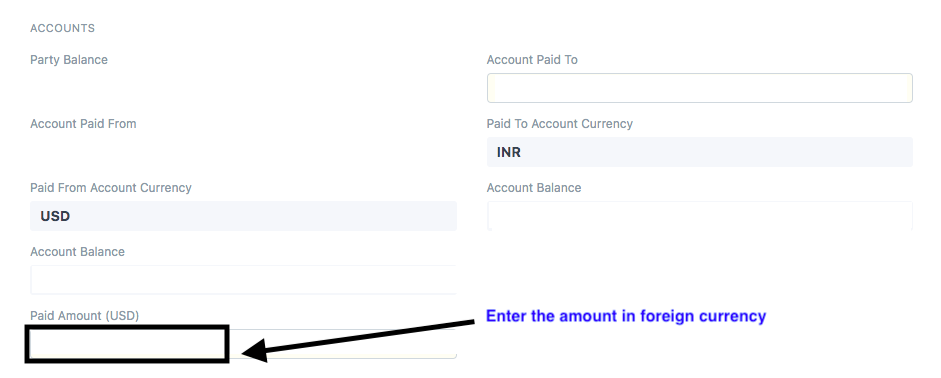
You need to enter the amount that you are paying / receiving in the section along with the currency in which the payment is made/received (as shown in figure)
Note: You need to enter the total amount paid/received in the "Paid Amount" section in foreign currency

How to use "Payment Account 2" in Forex payment Entry
In certain cases, while making a payment it might happen that you cannot pay full amount from one account due to insufficient fund or any other reason.
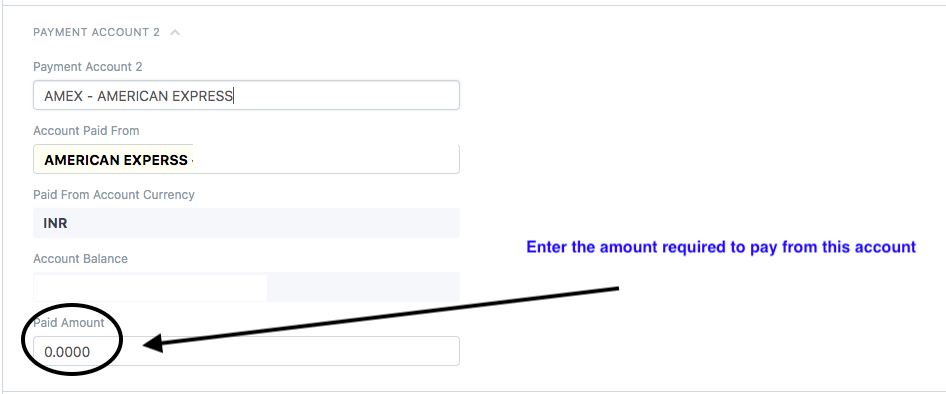
In this case, you need to use "Payment Account 2" ( as shown in figure)

- Payment Account 2: Account from which payment is supposed to be made
- Account Paid From: Auto-generated on the basis of "Payment Account 2"
- Account Balance: Auto-generated on the basis of exact balance present in the account
- Paid Amount: You need to enter the amount that is supposed to be paid from this account in this section
Current Exchange rate will pop-up and calculated amount will be done.You can also change the exchange rate manually

How to allocate payment entry to the invoices in a semi-automated way
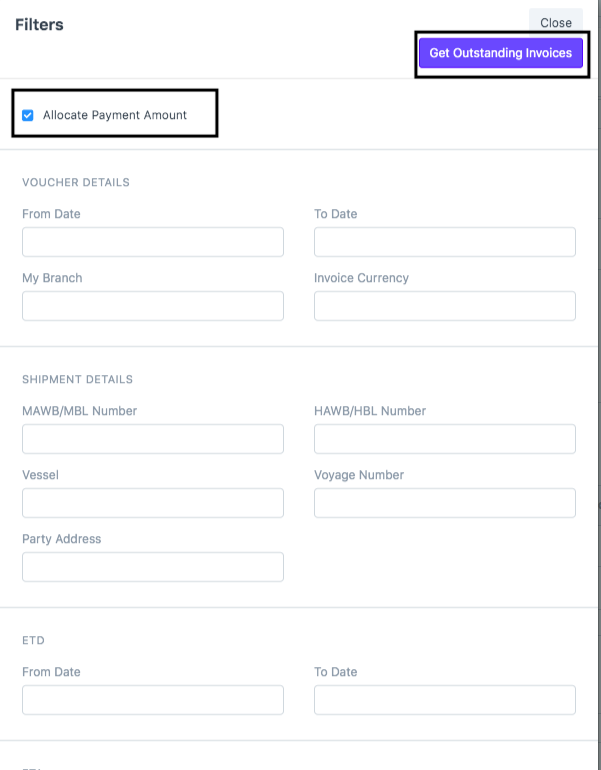
- You can get the outstanding invoices by clicking here and knock-off the invoices respectively

You can also apply the various filters (as shown in figure) under the sections as Voucher Details,Shipment Details, Estimated Time of Departure, Estimated Time of Arrival to get your outstanding invoices
"Amount is auto-allocated since the check-box is ticked for "Allocate Payment Amount"
In case you want to allocate the amount manually, you can untick the box

How can you allocate payment entry to an outstanding Invoice manually
Allocating invoices to an outstanding invoice refers to knocking off the payment entry against respective invoices
In case you want to add reference or relate any invoice to it, you can add invoice details here:

You will also be able to see the total exchange Gain/Loss on your transaction


Click on "Save" and "Submit" to make the respective entry in accounting books
How to view Ledger entry of this entry
To view the ledger entry of the forex entry made, you can click on "Ledger" option (as shown in figure)

You will be able to see the Ledger view (as shown in figure)
 Did this answer your question?
Related Articles
How to record a Forex Payment/ Receipt Entry
How to record a Forex Payment/ Receipt Entry Helps you make an entry for the transaction in which the payment is either received or made in a Foreign Currency Alok Patel Forex payment entry is an entry in which the payment is either made/received in ...How to Cancel a Forex Payment/Receipt Entry
How to Cancel a Forex Payment/Receipt Entry Helps you cancel a forex payment entry if you have made any error Alok Patel In case you have made an error or wish to cancel a payment entry in our system due to any discrepancy, you can do so using the ...How to Cancel a Forex Payment/Receipt Entry
How to Cancel a Forex Payment/Receipt Entry Helps you cancel a forex payment entry if you have made any error Alok Patel In case you have made an error or wish to cancel a payment entry in our system due to any discrepancy, you can do so using the ...How to amend a Forex Payment/ Receipt Entry
How to amend a Forex Payment/ Receipt Entry Once you have made the cancellation of the forex payment entry, you will need to amend the entry Alok Patel Once an entry is cancelled and you want to make the changes to the same entry, you can do so by ...How to amend a Forex Payment/ Receipt Entry
How to amend a Forex Payment/ Receipt Entry Once you have made the cancellation of the forex payment entry, you will need to amend the entry Alok Patel Once an entry is cancelled and you want to make the changes to the same entry, you can do so by ...